
For Starmaster GOTO Telescopes
with SkyTracker
Installation:
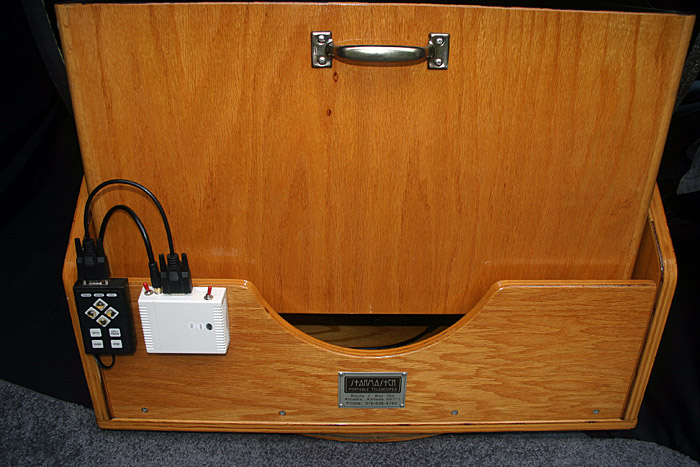
After modification of the original Sky Tracker hand controller, it is shipped back along with the wireless system with all components connected as shown below:
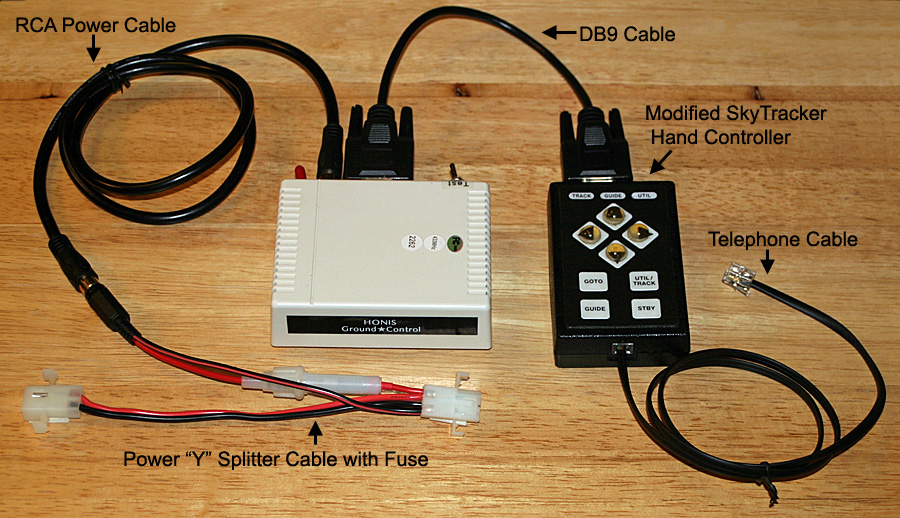
Follow these two steps to install the wireless system on your Starmaster telescope:
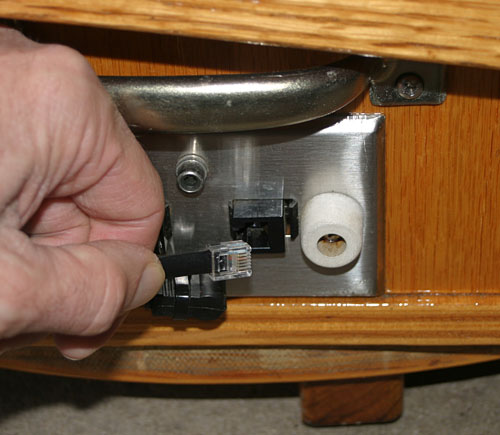
STEP 1: The original Skytracker Hand Controller is connected to the telescope using the supplied telephone cable with RJ45 modular jacks.
This connection can be made at either of these two locations:
The Female RJ45 Port on the side of the telescope near the base (PIC):
OR
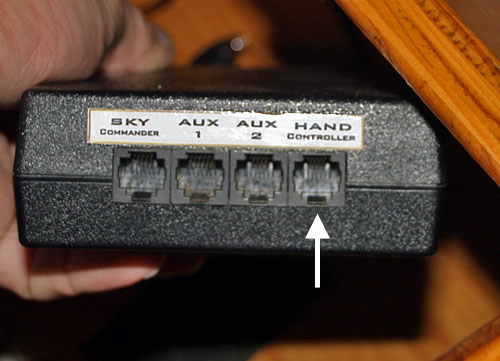
The Female RJ45 Port labeled "Hand Controller" on the Skytracker Unit (PIC):
STEP 2:
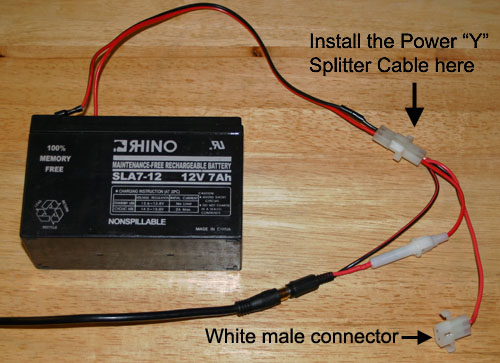
Disconnect the pigtail power cable from the telescope battery at the white Male/Female quick connect connector and install the "Power "Y" Splitter Cable with Fuse " as shown below. Reconnect the telescope to battery power at white male connector:
The wireless receiver can be located anywhere on the telescope. One location, at the bottom of the rockerbox, is shown in the photo below. The Skytracker Hand Controller is connected with the provided telephone type cable to the "Hand Controller" port of the SkyTracker unit. The drive speed LED lights on the Skytracker hand controller can be seen at the eyepiece from most positions of the telescope.

Another possible arrangement is to mount the receiver and hand controller using the provided velcro to the outside of the rockerbox as in the photo below:
Operation:
The original wired hand controller remains completely functional and can still be used at the same as the wireless remote controllers. Turn on your Sky Commander and SkyTracker units as you would normally, then turn on the wireless receiver using the toggle switch labeled "Power".
The wireless remotes will now function and their buttons operate the telescope in the same manner as the original SkyTracker hand controller.
There is a toggle switch on the wireless receiver that is labeled "Test". With the test switch in the ON position, a tone will be heard whenever a button is pressed on a wireless remote and verifies that the wireless receiver is working. Operating the receiver with the test tone turned ON is a good way to become familiar with the operation of the wireless remotes when you first begin using the system.
If at any time the telescope drive system slews without reason, to quickly stop the telescope, press the standby button on the controller or disconnect the battery or turn the SkyTracker unit to OFF.
Troubleshooting:
If your wireless system fails to work, some trouble-shooting tips follow:
1. Disconnect the DB9 cable on the original SkyTracker hand controller and verify that the telescope is working as it should without the wireless system installed. If so, continue with the following steps.
2. Re-connect the DB9 cable on the original SkyTracker hand controller. Place the wireless receiver in test mode by turning the "Test" toggle switch to ON. Make sure that its power switch is set to ON. Using both wireless remotes, press their buttons and listen to tones from the wireless receiver. If none are heard, there may be a power problem to the wireless receiver. Check all power connections from the telescope battery. Also check the fuse in the "Power "Y" Splitter Cable".
3. Check the telephone connections from the original SkyTracker hand controller. Replace the provided telephone cable with the original telephone cable provided with the Starmaster. Change position of the telephone cable connection between the side port at the bottom of the telescope and the hand controller port on the SkyTracker unit.
4. Check the RJ45 female ports on the telescope for the telephone cable connection if being used. They will have four contact pins. Sometimes with repeated use, these pins get weak and do not make good contact. These pins can be carefully pulled back into their normal position for better contact. You can make a tool for doing this out of a stiff wire like a paper clip. Just bend the tip of the paper clip at a right angle and use it for pulling up the weakened contact pin. Be sure that all power is disconnected before doing so.
5. Make sure that the batteries are good in the wireless remote units and that the power switch for the black wireless remote is turned to "N" for "ON".
6. Please contact me by email or phone to resolve the problem.
This device complies with Part 15 of the FCC Rules. Operation is subject to the following two conditions: (1) this device may not cause harmful interference, and (2) this device must accept any interference received, including interference that may cause undesired operation. The user is cautioned that changes or modifications to this device could void the user's authority to operate the equipment.
Caution:
Changes or modifications to this unit not expressly approved by
the party responsible for compliance will void the user’s
authority to operate the equipment. Any change to the equipment
will void FCC grant. Note: These limits are designed to provide
reasonable protection against harmful
interference in a residential installation. This equipment generates,
uses and can radiate radio frequency energy and, if not installed
and used in accordance with the instructions, may cause harmful
interference to radio communications. However, there is no guarantee
that interference will not occur in a particular installation.
If this equipment does cause harmful interference to radio or
television reception, which can be determined by turning the equipment
off and on, the user is encouraged to try to correct the interference
by one or more of the following measures:
—Reorient or relocate the receiving antenna.
—Increase the separation between the equipment and receiver.
—Connect the equipment into an outlet on a circuit different
from that to which the receiver is connected.
—Consult the dealer or an experienced radio/TV technician
for help.
Modifications not authorized by the manufacturer may void users
authority to operate this device. This device complies with part
15 of the FCC Rules.