 Introduction:
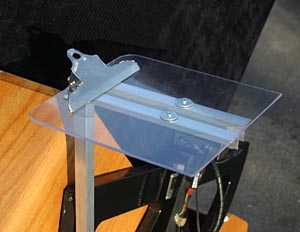
Introduction:
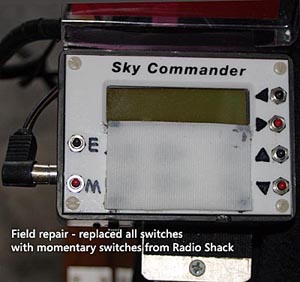
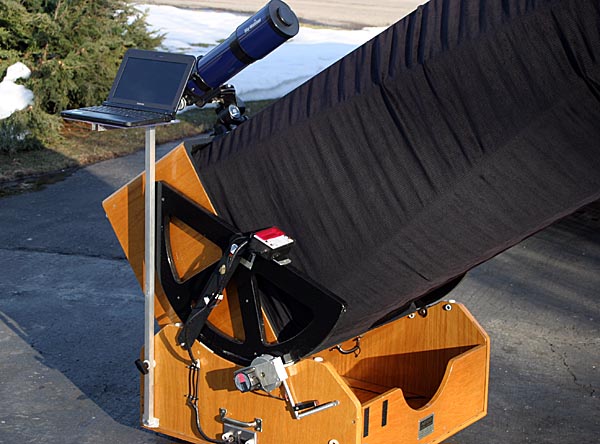
As of 2010, my 20" Starmaster with GOTO Skytracker is 11 years old. My Sky Commander unit is the same age and I have replaced all the button switches because I wore them out. I think it is a testament to the quality of the Starmaster SkyTracker GOTO system that is has performed so well for observing and imaging for over more than a decade of heavy use and is still upgradeable today. One option that enhances the SkyTracker system to a major extent is computer control, especially now that an ASCOM driver is becoming a reality, thanks to Mike Radwick. In September 2009, when I saw low cost and light weight mini-computers becoming available, I bought a Toshiba NB205 mini-notebook. I had operated my Starmaster many times before for observing and astro-imaging, but the cable running from the computer to the telescope was annoying. A mini-computer at less than 3 pounds can be easily mounted on the Starmaster. This allows the use of planetarium and other telescope control software to be used right at the telescope, near the Sky Commander unit. The NB205 computer has a 9 hour battery life, so no external AC or DC power and related cables are required. The battery life is sufficient to get through an all night observing/imaging session. I have elimintated all annoying external wires since my telescope is also equipped with the wireless Honis Ground Control System.
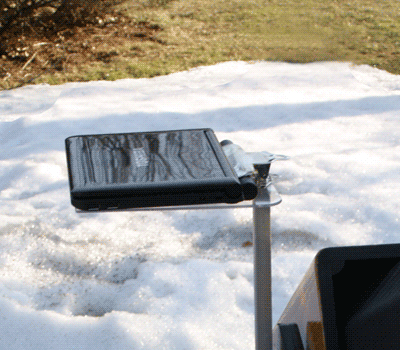
Here is the completed computer mount including computer (NB205) on the telescope:
Weight:
Mount only: 1.2 lbs.
Mount with computer: 4.0 lbs.
Parts:
Total Cost: $16
...........................
Tools:
Hack saw
Hand drill
Screwdriver
Small wrench
Construction:
Note: These construction notes are for my 20 inch Starmaster. You may want to adjust the height of the mount based on the size of your telescope and your height. The computer I use is a Toshiba NB205 and it may be differ in size and weight compared to your computer.
Toshiba NB205 Mini-Computer:
Weight: 2.8 lbs.
Size: 8 X 10 inches
STEPS:
1. Cut
3/4 inch aluminum square channel stock to 3 foot length.
2. Cut 3/4 inch aluminum angle stock to two pieces, 9 inches
each in length.
3. Cut 3/4 inch aluminum angle stock to 2.5 inches length
and cut off corners at an angle.
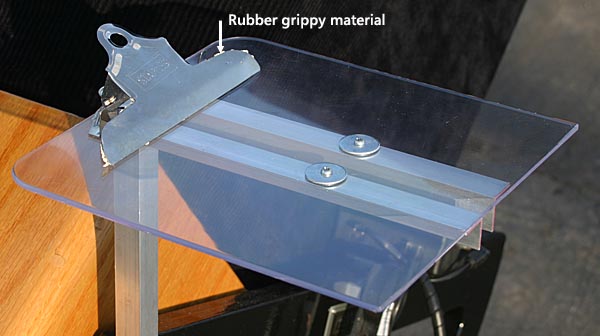
4. Cut clipboard so that it is 9 inches in length.
5. Drill two holes in each end of the 9 inch aluminum pieces
and attach to 3 foot aluminum piece with bolts as shown:
6. Place
clipboard on top of mount and mark and drill four holes through
clipboard and through aluminum stock and attach with bolts and
nuts as shown above.
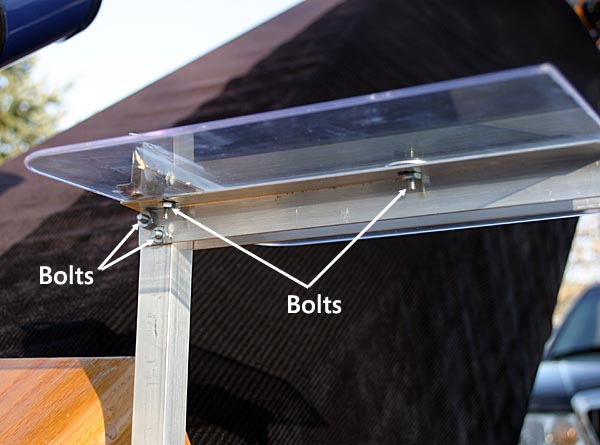
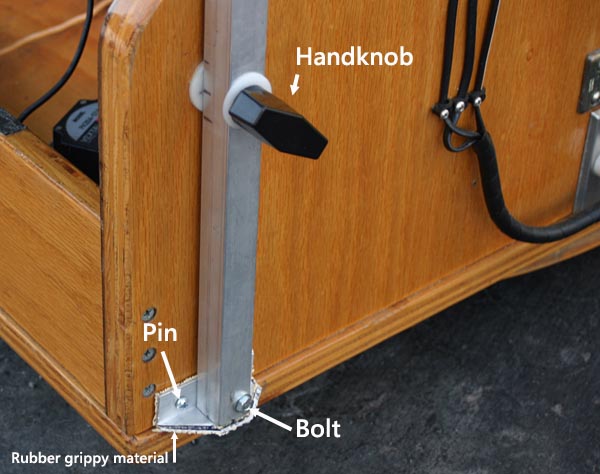
7. Drill hole through 2.5 inch aluminum piece, through
the bottom (back) of the 3 foot length aluminum and attach with
bolt and nut as shown in photo below.
8. Glue strips of rubber grippy material on the back of
the 2.5 inch aluminum piece and also to clamp on clipboard. The
rubber material keeps the telescope rocker box and the computer
battery from being marred. I also installed a small bolt to act
as a pin, into a small hole drilled in the rocker box to keep
the computer support from rotating out of position.
Mount Installation:
1. Attach mount to telescope base using same hand bolt used to attach wheel barrel handles (or buy another one) as shown above. You will need to mark and drill a hole in the 3 foot aluminum section for this.
2. Place Computer on clipboard and secure with the clipboard
spring clamp onto the computers battery pack.
3. For added security place elastic band around bottom
edge of computer and clipboard. The NB205 computer has a channeled
ridge ideal for this.
Computer Cable Connection:
My computer does not have a serial port that is needed for connection to the SkyTracker unit. So, I use a USB to Serial converter.
1. Install
USB to serial converter in USB port.
2. Install serial cable from converter to AUX#2 port of
Skytracker Unit.
The cable can be routed inside the aluminum mount channel or attached to it using tie wraps as a complete unit. For easy removal and portability, I prefer to leave the cable from the SkyTracker unit connected and stored at the bottom of the rocker box. That way, it can be quickly lifted out the back of the telescope and connected to the mini computer.
Tested Software:
I have been testing the setup as a beta tester for Mike Radwick's ASCOM driver for Starmaster telescopes equipped with SkyTracker. THE SKY 6 Pro has been working very well. Having a planetarium program for locating and slewing to objects is a great addition. I've added the many observing lists I've accumulated over time, so they're on the mini-notebook for quick GOTO's using The Sky 6. One use for the mini-notebook has been to use it to autoguide using PHD guiding while imaging planets using a webcam. Autoguiding keeps the planet centered for imaging without the need to keep the planet centered in the FOV by the wireless hand controller. Recent Mars images using this setup are here.
Looking forward to testing other software with the system, such as observing and imaging planning software.
TO MY MAIN ASTROPHOTOGRAPHY PAGE