
Disassembly of an Olympus C2000Z:
Detailed below is the procedure I used to disassemble a C2000Z. My goal is to make a cooling system for the camera to cool the CCD chip in order to reduce noise. The C2000Z is capable of 32 second exposures using a trick as explained on my site at Part 4
Click on all thumbnails below for larger images:
AIR COOLING: 
Upon disassembly of the camera, I removed the camera's tripod connector, See pic. I will use this opening in my experiments at air cooling the camera. This opening is sufficiently large and is in the area of the CCD chip and camera electronics. There are a number of small openings elsewhere in the camera for air exhaust. I need to develop a method of creating the cold air to circulate through the camera. I have some ideas, but if anyone has any suggestions please email me at: mailto:ghonis@epix.net
PELTIER COOLING:
If I am not successful at air cooling or satisfied with its results, I may attempt peltier cooling. (See my peltier/fan cooled quickcam page) When the camera housing is taken apart, the back side of the camera housing contains only the LCD display that is connected with a cable. (See pic in STEP 10 below) A peltier device/cold finger could be connected to aluminum shields that are located on the electronic boards behind the CCD chip and a new back housing fashioned to accommodate the peltier/heat sink. Since the LCD display is connected via a cable, it could be relocated on the newly fashioned housing. This may be enough of a cooling effect for 32 second images. A more drastic hack would be to dismount the circuit boards in order to get at the CCD chip directly for peltier cooling. I suspect that the CCD chip may use an aluminum plate, that I saw with the camera open, to dissapate heat; but I could not verify this without further removal of the circuitry.
C2000Z DISASSEMBLY:
Warning!!!! Proceed at your own risk. This procedure will void your warranty from Olympus. After disassembly and reassembly, my camera functioned properly, but your camera may not.
Tools: 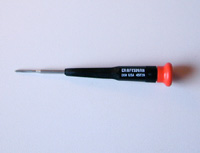
Click on all thumbnails for larger images
Only one tool is needed; a very small phillips head jeweler's screwdriver. I would not recommend using a small flat head jeweler's screwdriver. I bought a size #000 driver from Sears for $2 (Part # 45726). See pic. It is sold in the screwdriver section as a single unit. The driver is magnetic, which helps with the small screws and fits all screws of the camera well.
STEP 1: 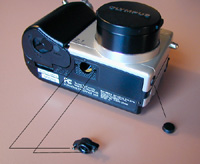
Remove two black screws from tripod connection. See pic for location of screws. The tripod connection is shown already removed in this pic which is accomplished in Step 11 below.
STEP 2: 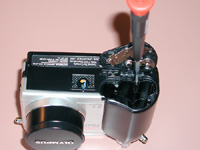
Remove two black screws in battery compartment. See pic.
STEP 3: 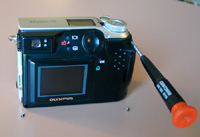
Remove three black screws in back plastic housing at three corners. Note that the upper right hand corner, as viewed from the camera's back, is a longer screw than the other two screws. See pic.
STEP 4: 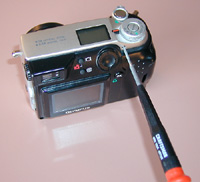
Remove silver screw on back of metalic trim near dial.
STEP 5: 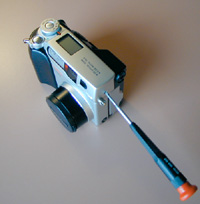
Remove silver screw from the metallic housing on right side of camera as viewed from the front. See pic.
STEP 6:
Remove silver set screw from dial. No pic.
STEP 7: 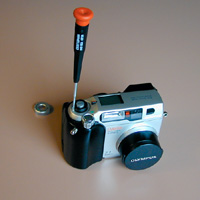
Remove silver screw from metallic trim near dial. See pic.
STEP 8: 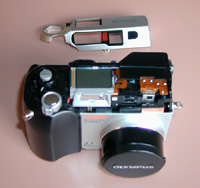
Remove top metalic trim
STEP 9: 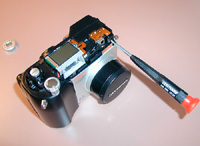
Remove black screw from upper right corner of housing from front., above and to the right of the camera lens. This screw is set back in a recessed area about a half inch. Be careful not to lose screw - use a magnetic driver. See pic.
STEP 10: 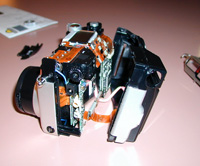 Note: This
is a large image in order to show detail.
Note: This
is a large image in order to show detail.
Separate front half from back half of camera housing. The battery cover and smartmedia card cover may fall off at this point......these are easily put back in place upon reassembly.
STEP 11: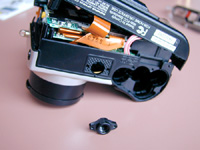
Remove the black plastic tripod connector - this port can be used to air cool the camera.
Reassembly is the reverse of disassembly.
Click on above thumbnails for larger images.
UPDATE: Aircooled Modification Complete - SEE: PART 7
TO PART 8 - AIR COOLED C2000Z LATEST IMAGES
TO PART 5 - 32 SECOND IMAGES WITH C2000Z
TO PART 4 - DEEP SKY IMAGING - LONG EXPOSURES
TO PART 3 - DEEP SKY IMAGING ON 10/31/00
TO PART 2 - DEEP SKY IMAGING ON 10/20/00
TO PART 1 - DEEP SKY IMAGING WITH 2X BARLOW
 For images taken
with the C2020Z and a Collins I3 Image Intensifier Eyepiece Click Here
For images taken
with the C2020Z and a Collins I3 Image Intensifier Eyepiece Click Here
TO MY DIGITAL CAMERA IMAGING HOME PAGE
TO MY MAIN ASTROPHOTOGRAPHY PAGE