C2020Z & C2000Z Olympus Digital Cameras for Deep Sky
Imaging
Two Sequential Mode Shutter Cable Modifications

(Click here for Part
1 or Part 2 or Part
3 or Part 4 or Part
5 or Part 6 or Part
7 of deep sky imaging with a C2020Z or C2000Z.)
The Olympus C2000Z and C2020Z cameras can take a series
of exposures in sequential mode. This mode allows the camera to more rapidly
capture images than by taking exposures one at a time. This is an advantage
for planetary imaging since many more images can be taken in a given time
and used for stacking. Unfortunately, the wireless remote that can trigger
individual exposures cannot be used to operate the sequential mode. In sequential
mode the camera's shutter button needs to kept depressed for the duration
of the series of sequential exposures. Below is a modification I made to
allow use of a standard camera shutter release cable with the C2000Z and
C2020Z for using the sequential mode without introducing vibrations at the
telescope.
MODIFICATION #1:

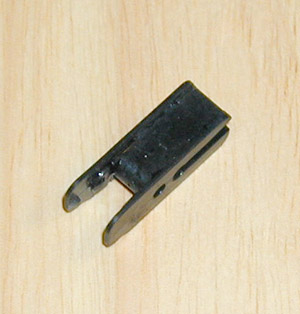
The primary part used is one of the small plastic adapter
pieces that comes with auto windshield wiper blade refills. I don't throw
anything away....ask my wife:) Here is a closeup of the part before one
flange is removed:
 Windshield Wiper Blade Refill Part
I cut off one of the two flanges (at bottom of above image)
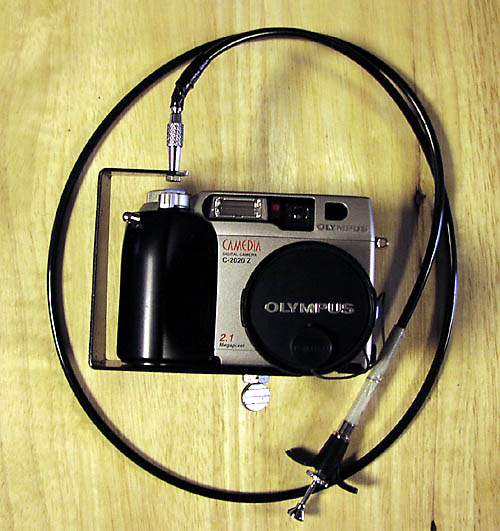
from the part with wire cutters. I attached the part to the small metal
shoulder strap post on the camera body with a thin bolt and two nuts as
shown in the image with labeled notes above. No drilling was required as
there was a slot already in the part for the thin bolt.
The camera shoulder strap post was turned with pliers
so that the hole was verticle. Since the post was at a slight angle, I used
a short piece of plastic tubing (from a cable connector) and angled one
end with the wire cutters and used it as a washer to cock the thin bolt
in a more verticle position.
I drilled a small hole in the plastic part for the shutter
release cable and just turned the cable end into it until it was tight (self
threading). A small piece of rubber was stuck to the camera's shutter button
with double sided tape to avoid marring of the button by the shutter release
cable.
The cable/plastic part can be easily removed by removing
the upper nut. The plastic part can also swing out from over the shutter
button in case you want to finger trigger the shutter button.
Do your wiper blades need changing? :)
MODIFICATION #2:
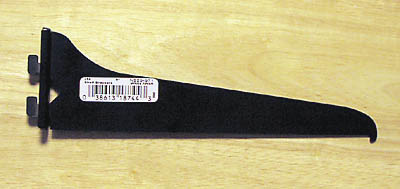
This modification uses a wall shelf bracket sold at hardware
stores for about $1.

I cut off the end with the two hooks with a hacksaw. I
drilled a small hole at the narrow end and mounted a camera shutter release
cable with a small nut. I bent the bracket in two places as shown below
and drilled a large hole for mounting the bracket to the camera's tripod
socket with a thumbscrew:

For deep sky images using the air-cooled C2000Z, CLICK HERE.
TO PART 7 - AIR-COOLED C2000Z MODIFICATION
TO PART 6 - DISASSEMBLY INSTRUCTIONS FOR C2000Z
TO PART 5 - 32 SECOND IMAGES WITH C2000Z
TO PART 4 - DEEP SKY IMAGING - LONG EXPOSURES
TO PART 3 - DEEP SKY IMAGING ON 10/31/00
TO PART 2 - DEEP SKY IMAGING ON 10/20/00
TO PART 1 - DEEP SKY IMAGING WITH 2X BARLOW
 For images taken
with the C2020Z and a Collins I3 Image Intensifier Eyepiece Click Here
TO MY QUICKCAM PAGE
TO MY MAIN ASTROPHOTOGRAPHY PAGE


 Windshield Wiper Blade Refill Part

 For images taken
with the C2020Z and a Collins I3 Image Intensifier Eyepiece Click Here